Scenes

Scenes are an easy-to-use and yet powerful tool to personalize your evon Smart Home and adapt the controller to your requirements. Without programming – directly from the app!

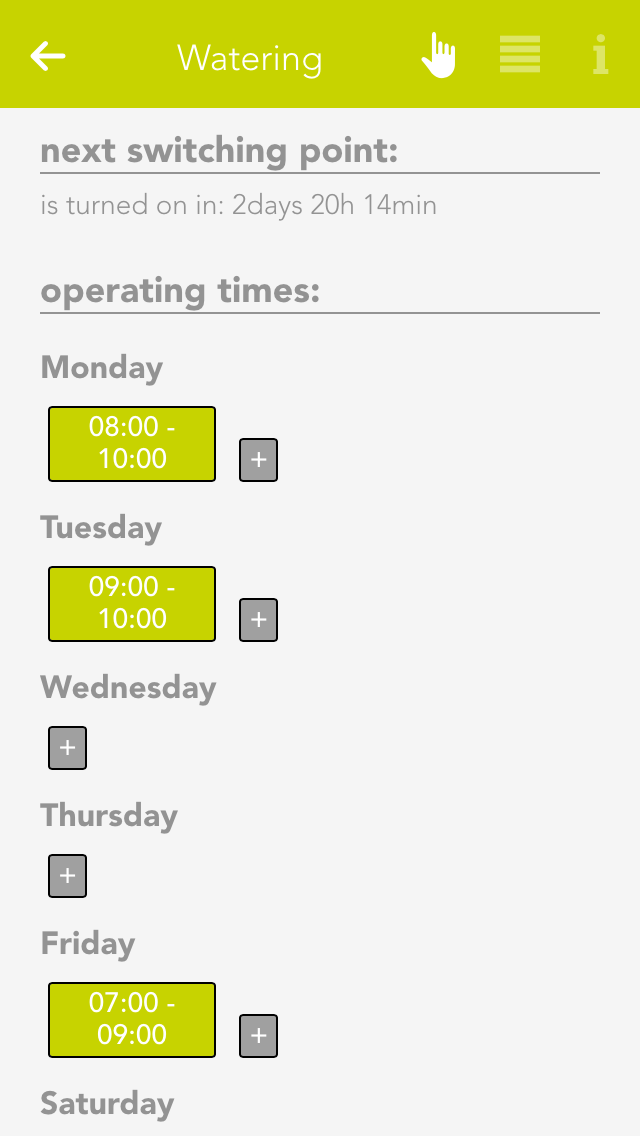
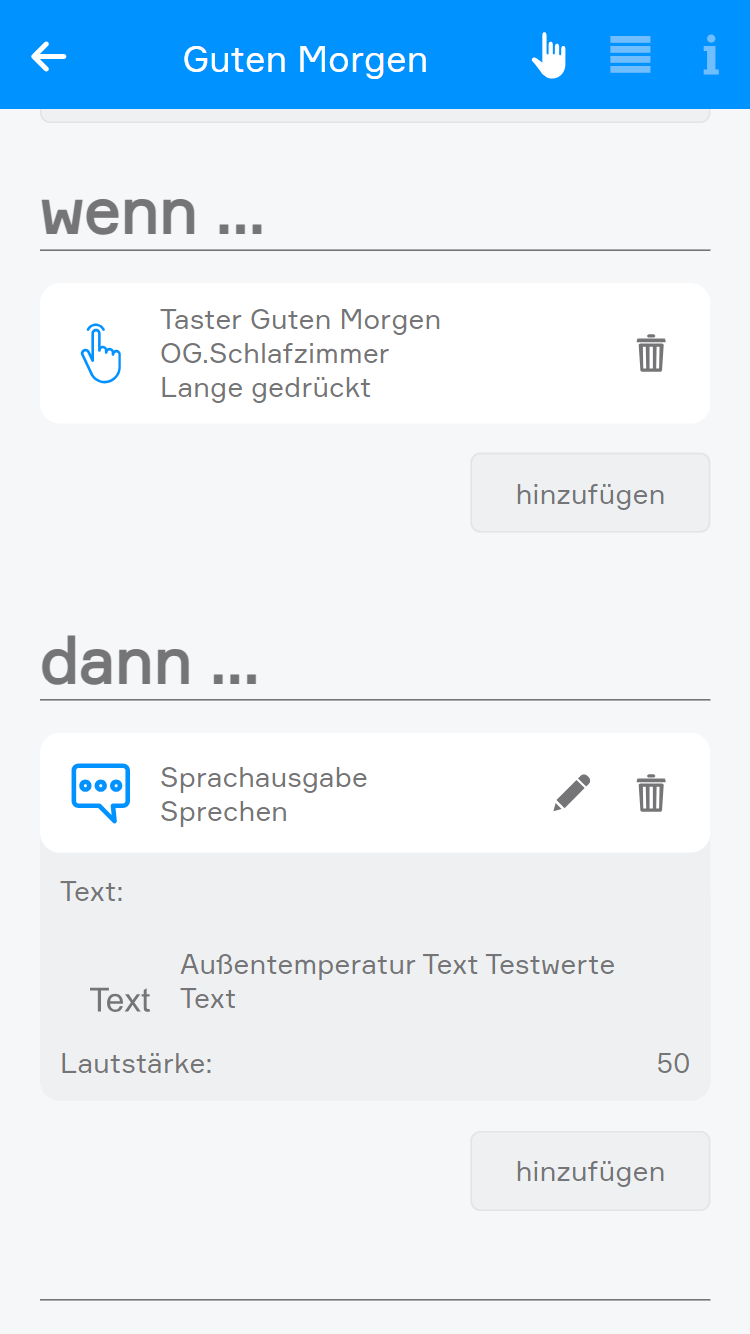
Scenes can help you to customize your evon Smart Home without a single line of code. This is done using the IF THEN principle, i.e. IF a button is pressed, THEN open all the blinds in the room. This principle allows you to combine almost all functions in your controller with each other and to form relationships between them. Creating scenes is not complicated. And if scenes are not sufficient, you can extend your evon Smart Home with logic.

You can find scenes under “all apps” – “scenes”.

Creating Scenes

To create a scene, simply open the app “scenes” and select “create new scene”. Then open the operator panel for this scene. Enter the name and optionally a room. Then you can start with the configuration (described below).

If you want to invoke a scene from the visualization, you can do this via the left-hand area of the object panel or via the operator panel with the button “invoke”. Otherwise the scene is invoked automatically if the condition you selected using the “IF” statement is true.

If

To add a trigger condition, click in the area “IF” on the button “add” and a window will open where you can add a trigger condition.
For example, if you add a button then you have three options:

  • Pressed
  • More press
  • Double press

If you want to invoke a scene only via the app, you do not need a trigger condition.

If you wish to add several “IFs”, the scene can be invoked by each individual trigger condition, independently of each other.

Then

Click on the button “add” in the area “THEN” to select the action you wish to be invoked from the window that opens. For example, you have the possibility to switch lights on or off, to close shading elements or to move them to a specific position, etc.

For example, if you wish to move the blinds to a specific position, then you are offered the opportunity to define the exact position of this blind and the angle of the slats.

Duplizieren

Bereits erstellte Szenen lassen sich auch duplizieren. Klicken Sie dafür lange auf die Szene, welche Sie duplizieren wollen und wählen dann "Duplizieren" in der Leiste aus, welche am unteren Bildschirmrand erscheint.

Es werden alle Einstellungen der ausgewählten Szene dupliziert, wie z.B. Wenn, Dann, Bedingungen, Icon, Farbe und der Bereich der Szene.

Conditions

If you only want a scene to be invoked under certain conditions (for example only if it is raining), then you can do this using conditions.

To do this, click at the bottom of the overview on “conditions”. Select here the “only invoke if” and then you can select the corresponding value (e.g. under system – house status the value “rain active”.

After adding this value, you can select others. These are combined using AND or OR logic. If several values are combined via an AND, then all must be active (e.g. “rain active” AND “wind active”) for the scene to be invoked. IF several values are combined via an OR, then at least one of these values must be active (e.g. “rain active” OR “wind active” OR “both active”).

You can edit a condition by clicking on the pencil symbol and delete it by clicking on the trash can symbol.

If a scene is locked due to condition, you can see a padlock in the left-hand area of the object panel, which is also displayed in the operator panel.

Verlauf

Im Parameterpanel haben Sie die Möglichkeit, den Verlauf der Szene einzublenden. Hier werden die letzten 50 Aktionen angezeigt.

Der Verlauf beinhaltet folgende Aktionen:

  • Szene wurde ausgelöst
  • Szene wurde aufgrund einer Bedingung nicht ausgelöst
  • Szene wurde aktiviert
  • Szene wurde deaktiviert

Examples

Garden Watering

The following example shows you how to irrigate your garden using a weekly programme and scenes.
You own a garden irrigation system and would like to activate it at defined times. The garden irrigation system is connected to a digital output, i.e. if this output is active, the irrigation system is switched on. If the output is inactive, the irrigation system is switched off.

The first thing you need is a weekly programme. Create the weekly programme in the app “clock” and select “add clock”, then “weekly programme”. Next, name your weekly programme in the operator panel (e.g. garden irrigation).

Now select the day the irrigation system should be active via the “+” button. In the window that opens, define the two times “from “ and “to”. This means the irrigation system should be active between these times (e.g. Monday from 8 am to 10 am). When you have done this, you can see the time until the next switch point at the top of the operator panel.

Once you have entered all the times when you want the irrigation system to be active, you can change to the parameter panel. If you wish the irrigation system to be active outside of the defined times, you can select under “additional trigger” the trigger that you want to also activate the irrigation system (e.g. a switch is pressed). In the item “runtime for additional trigger”, you need to define how long the irrigation system should be active if you activate it via a switch.

Now all you need to do is link the digital output with the weekly programme. You do this via a scene.

Create a scene, select “add” in the IF section and select your weekly programme, then click on “activate”. Select the digital output under “THEN” and select “ON”. Then create another scene and select the weekly programme for “IF” and select “OFF”
Now your garden irrigation system is ready. Make further adjustments to the weekly programme as required.

Szenen

Erstellte Szenen können Sie auch in andere Szenen im "Dann" Bereich verwenden und diese so z.B. auslösen oder deaktivieren.

Es stehen folgende Funktionen für evon Smart Home Szenen (Dann...) zu Verfügung:
- Aktivieren: Die Szene wird aktiviert (wenn die Szene vorher deaktiviert war)
- Auslösen: Die Szene wird ausgelöst
- Deaktivieren: Die Szene wird deaktiviert und kann damit von keinem Auslöser (Wenn) gestartet werden

Szenengruppen

Über Szenengruppen lassen sich mehrere Szenen gruppieren um die Übersichtlichkeit zu verbessern.

Um eine Szenengruppe zu erstellen klicken Sie auf das Element „Neue Szenengruppe hinzufügen“. Danach öffnet sich ein Panel in dem Sie dieser Gruppe einen Namen (z.B. „Garten“), Farbe und ein Icon zuweist.

Um eine Szene für diese Gruppe zu erstellen, klicken Sie den Button „Gruppe öffnen“ und wählen dort „Neue Szene erstellen“ aus. Danach öffnet sich das Operatorpanel. Hier geben Sie Name und optional auch einen Raum an.
Auch bestehende Szenen können im Parameterpanel einer Szenengruppe nachträglich zugeordnet werden