Clock

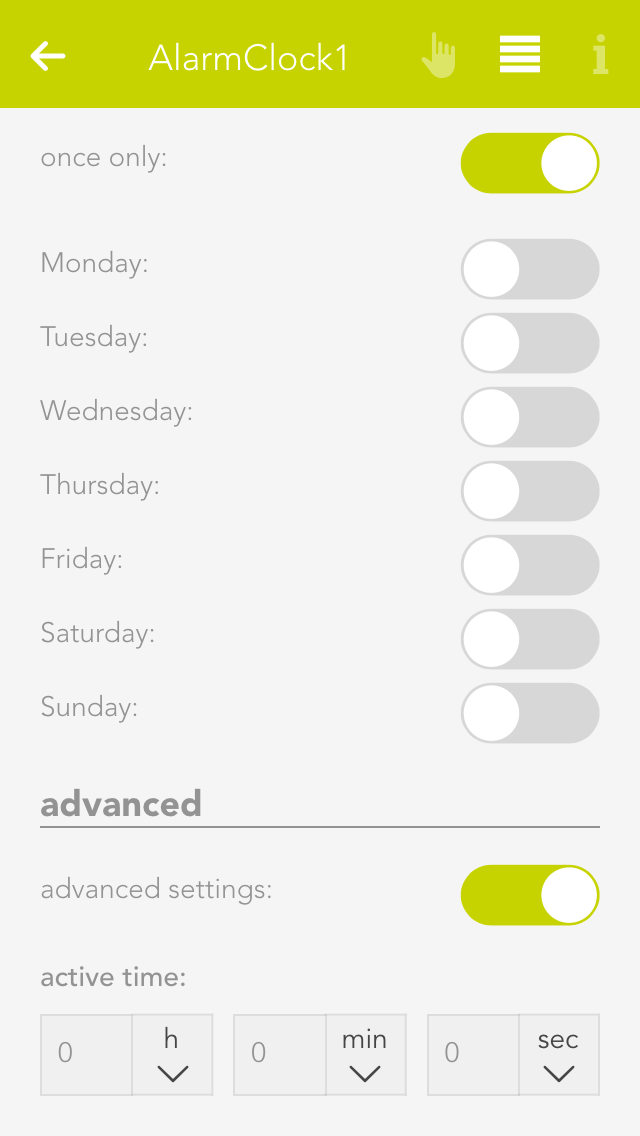
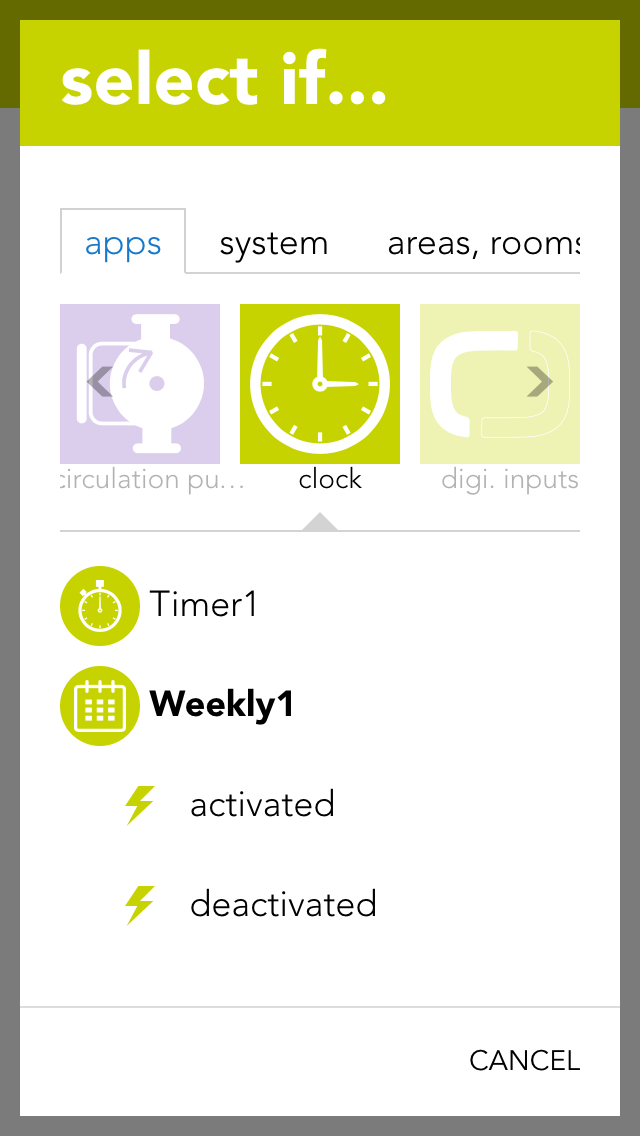
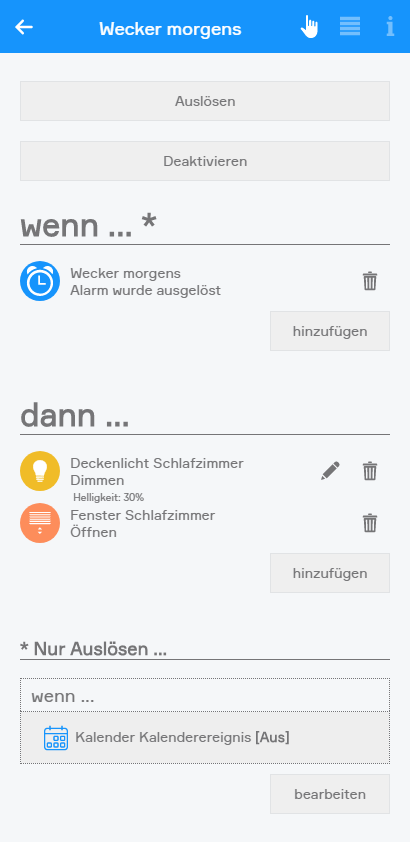
The clock lets you create an alarm clock, a timer or a weekly programme. The next chapters explain how to use them.

The clock is located under “all apps” – “clock”.

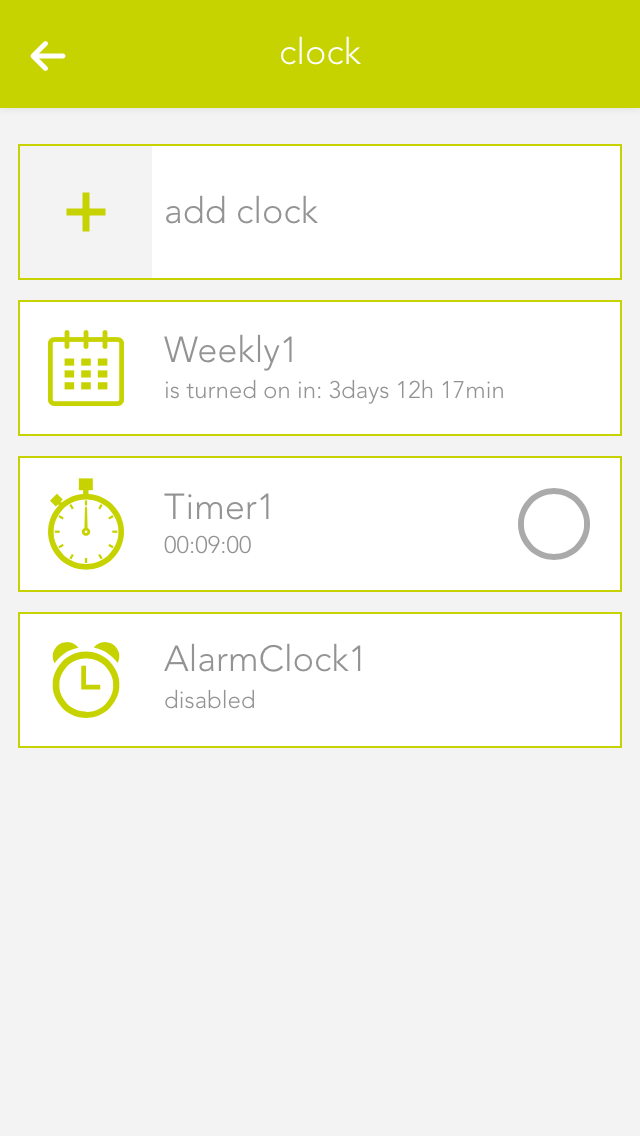
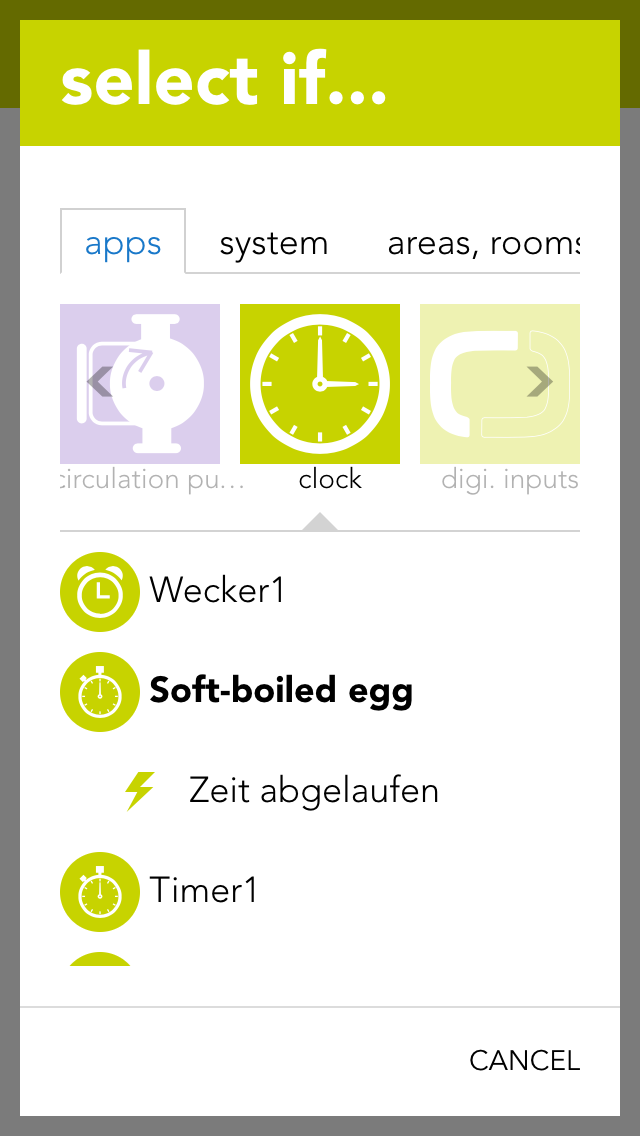
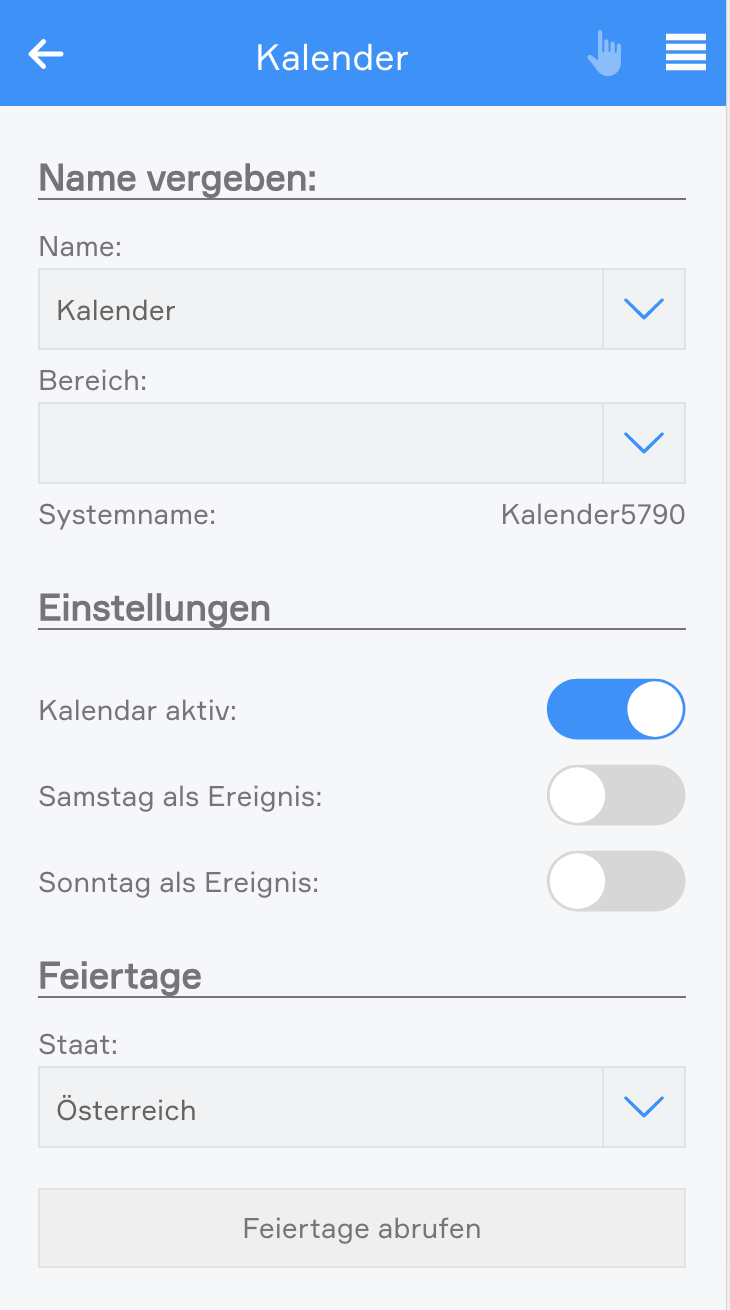
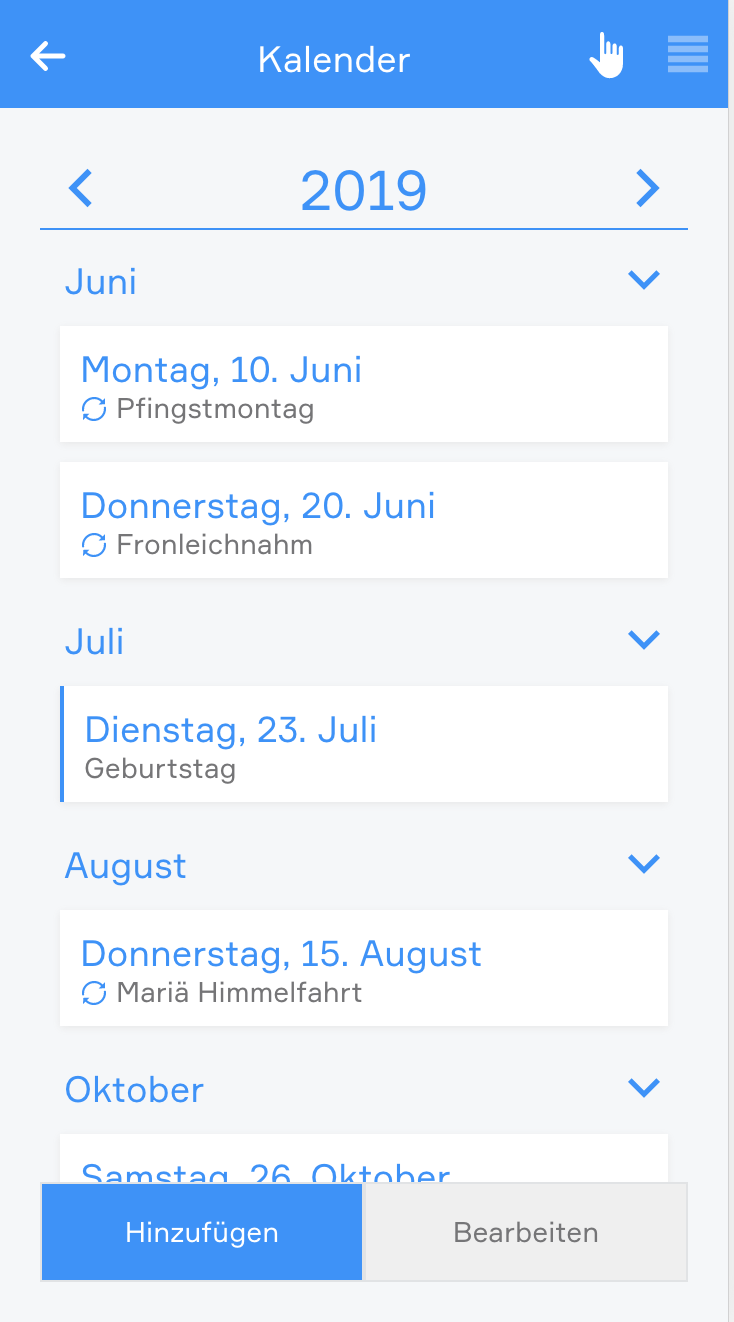
To create an alarm clock, a timer or a weekly programme, simply open the app “clock” and select “add clock”. A window then opens offering you a selection of elements you can create.

Alarm Clock

The app “alarm clock” lets you create an alarm clock that goes off at the time you define and is shut off after a certain time. An alarm clock is intended to be used with a scene to react to the alarm and the end of the alarm.

Using With A Scene

In order to use this alarm with a scene, it must first be named and then you can click on “add” in the scene’s “IF” and select the app “Clock”, unfold the alarm clock and select either “alarm triggered” or “alarm ended”.

Configuration

To define the alarm time, simply click on the currently defined time and select the time you wish for the alarm. You must also activate this alarm via the option “activate”.

The item “repeat” lets you select which on weekdays should the alarm be repeated. If you only want the alarm to go off once, select the option “just once”.

The length of time the alarm is active can be set under “extended” by activating the option “activate extended settings”. You will need the active alarm time if you want the alarm to last for a specific time. For example, if you have activated the alarm for 8pm with an active time of 10 minutes, then the alarm is active from 8 pm till 8:10 pm and then switches itself off. If you haven’t activated this option then the alarm stops directly after the trigger.

Timer

The app “timer” lets you define a countdown that, once the defined time has expired, can invoke a scene. You can also allocate a signal light to this timer that signals when the time has expired.

Operation

To adjust the time, click on the currently defined timer for this timer in the operator panel under “operation” and change it as you require.

The button “start” is used to start the timer and “reset” to reset the start time. The button “pause” stops the timer and you can continue the timer by pressing “start”.

Using With A Scene

In order to be able to use this timer with a scene, it must have a name. Then you can select the trigger “time expired” in the scene under “IF” and the appropriate action to be carried out when the timer has expired. You can also use the timer in the scene for the “THEN”. This lets you start, stop or reset a timer via a scene.

Configuration

Once you have allocated this timer a name and optionally a room, you can begin with the configuration.

You can add as many lights as you want in the item “signal light” using the button “add”. These lights are intended to flash on and off and the number of flashes can be set via the option “number of flashes”. The duration of each flash can be set via the “duration of signal flash”.

Weekly Program

The app “weekly program” lets you define up to 3 time periods per day in which you can execute actions. In order to be able to carry out an action, a scene must react to the activation and de-activation of the weekly program.

Using With A Scene

In order to be able to use this weekly program, you must give it a name. Once done, you can select the triggers “activated” and “de-activated” in the scene’s “IF” statement. For example, if a time from 9 am to 10 am has been defined for each Monday, then “activated” is invoked at 9 am and “de-activated” is invoked at 10 am. Furthermore you can use the weekly program in the scene for “THEN” by selecting “switch on once” (“switch on once” is explained in the chapter “configuration”).

Creating And Editing Entries

To create an entry in the weekly program, click on “+” for the desired day. This opens a window where you can configure the entry. You have the following possibilities:

Day
The weekday for which this entry is to be created.

No end time
If you only want to define a start point then activate this option. If a point has no end time, then the weekly program is activated after the time for the “runtime for additional trigger” has expired (located in the parameter panel).

From
This is the start point for your entry

Until
This is the end point for your entry

To edit an entry, click on the previously created entry (in the operator panel) and then proceed the same as for creating the entry.

Configuration

Runtime for additional trigger
If the weekly program is activated once via the additional trigger, then the weekly program remains active for the defined time. If you have an entry without end point, then the weekly program also remains active for this time after the defined time has expired.

Additional trigger
You can add as many additional triggers as you wish that trigger the weekly program once.

Kalender

Mit der App „Kalender“ können Kalendertage wie Feiertage oder andere Ereignisse verwaltet werden. Kalenderereignisse können dann als Ausnahmebedingungen in Szenen verwendet werden.

Konfiguration

Sie können einen neuen Kalender unter "Alle Apps" - "Zeitprogramme" durch Klick auf "Zeitprogramm hinzufügen" anlegen.

Um länderspezifische Feiertage automatisch dem Kalender hinzuzufügen, muss das Land ausgewählt werden. Wenn keine Feiertage hinzugefügt werden sollen, kann "Keine Feiertage hinzufügen" ausgewählt werden.

Feiertage können später jederzeit neu in den Kalender importiert werden.

Wenn die Wochenendtage Samstag oder Sonntag als Kalenderereignis verwendet werden soll, können Sie dies auswählen.

Achtung: Diese Tage werden aus Gründen der Übersichtlichkeit nicht im Kalender aufgelistet.

Nach erfolgreicher Erstellung eines Kalenders kann dieser im Parameter Panel konfiguriert werden. Dabei kann dieser wie gewohnt benannt und einem Bereich hinzugefügt werden.

Durch Deaktivieren des Kalenders werden alle Kalenderereignisse inaktiv.

Zusätzlich können die Einstellungen wie Land oder Wochenendereignisse geändert werden, sowie Feiertage importiert werden.

Bedienung

Im Object Panel des Kalenders ist ersichtlich, ob dieser aktiviert (blau) oder deaktiviert (grau) ist. Aktuelle Kalenderereignisse werden unterhalb des Namens aufgelistet.

Im Operator Panel werden alle Kalenderereignisse dargestellt. Dabei können Sie erkennen, ob es sich um einen Feiertag oder ein selbst hinzugefügtes Ereignis handelt. (Selbst hinzugefügte Ereignisse werden mit einem seitlichen blauen Balken dargestellt). Wiederholende Ereignisse werden mithilfe eines Kreises dargestellt.

Im unteren Bereich können Sie einen neuen Kalendereintrag hinzufügen oder bestehende bearbeiten. Dabei können einzelne Einträge gelöscht oder ignoriert werden.

Szenen

Die konfigurierten Kalender-Ereignisse können als "Bedingungen" bei den evon Smart Home Szenen verwendet werden. Als einfaches Beispiel kann die morgendliche Weckfunktion genannt werden. Die Szenen wird über einen Wecker im "Wenn-Bereich" aktiviert und schaltet im "Dann-Bereich" bestimmte Lichter und Beschattungselemente. Diese Funktion ist jedoch an Feiertagen nicht gewünscht, hierzu kann nun der Kalender als "Bedingung" gesetzt werden.

Szenen

Die Zeitprogramme bieten folgende Auslöser für evon Smart Home Szenen (Wenn...):

  • (Wecker) Alarm wurde ausgelöst: Der konfigurierte Alarm wurde ausgelöst
  • (Wecker) Alarm wurde beendet: Der Alarm wurde beendet
  • (Timer) Zeit abgelaufen: Die konfigurierte Timer-Zeit ist abgelaufen
  • (Wochenprogramm) Aktiviert: Eine der konfigurierten Zeiten des Wochenprogramms wurde aktiv
  • (Wochenprogramm) Deaktiviert: Eine der konfigurierten Zeiten des Wochenprogramms wurde inaktiv

Die Zeitprogramme bieten folgende Funktionen für evon Smart Home Szenen (Dann...):

  • (Timer) Neu starten: Der Timer wird zurückgesetzt und neu gestartet
  • (Timer) Reset: Der Timer wird zurückgesetzt
  • (Timer) Start: Der Timer wird gestartet
  • (Timer) Stop: Der Timer wird gestoppt
  • (Wochenprogramm) Einmalig einschalten: Einmalig einschalten: Das Wochenprogramm wird einmalig aktiviert

Die Einträge des Jahreskalender können als "Bedingungen" in Szenen verwendet werden. Die Szene soll zum Beispiel nur auslösen, wenn kein Feiertag ist (Bedingung).